
前回記事でDS3231というチップのRTCを試してみたが、今回はDS1307という別チップのRTCを試してみる。
更に“1602LCDにPCF8574を接続しテスト”で試したLCDに時刻を表示してみる。
Arduinoへの配線とライブラリ
今回もI2Sのみの配線だが、一応表を書いておく。
| Arduino | DS1307 | LCD(PCF8574) |
|---|---|---|
| A4 | SDA | SDA |
| A5 | SCL | SCL |
ライブラリは以下の物を利用させて頂く。
LCDクロックのスケッチ
上記ライブラリのサンプルスケッチとLCDライブラリのサンプルスケッチを参考に作成した。
LCDclock.ino
#include <LiquidCrystal_PCF8574.h>
#include <Wire.h>
#include <RTClib.h>

char daysOfTheWeek[7][4] = {"Sun", "Mon", "Tue", "Wed", "Thu", "Fri", "Sat"};

RTC_DS1307 RTC;
LiquidCrystal_PCF8574 lcd(0x27); // set the LCD address to 0x27 for a 16 chars and 2 line display

int show = -1;

void setup()
{
  int error;

  Serial.begin(115200);
  Serial.println("LCD...");

  // wait on Serial to be available on Leonardo
  while (!Serial)
    ;

  Serial.println("Dose: check for LCD");

  // See http://playground.arduino.cc/Main/I2cScanner how to test for a I2C device.
  Wire.begin();
  Wire.beginTransmission(0x27);
  error = Wire.endTransmission();

  if (error == 0) {
    Serial.println(": LCD found.");
    show = 0;
    lcd.begin(16, 2); // initialize the lcd

    lcd.noBlink();
    lcd.noCursor();
    lcd.setBacklight(1);
  } else {
    Serial.println(": LCD not found.");
    Serial.print("Error: ");
    Serial.print(error);
  } // if

  RTC.begin();


} // setup()

void lcdPrintDigitFx(int data, int nDig)
{
  int dat = data;
  for(int n = 1; n < nDig; n++) {
    if ( dat < 10 ) {
      lcd.print(0);
    }
    dat /= 10;
  }
  lcd.print(data);
}

void loop()
{
  lcd.setCursor(0,0);

  static int prevDay;

  DateTime now = RTC.now();

  int day = now.day();
  if ( day != prevDay ) {
    lcd.clear();
    prevDay = day;
  }

  lcd.print(now.year(), DEC);
  lcd.print('/');
  lcd.print(now.month(), DEC);
  lcd.print('/');
  lcd.print(day, DEC);
  lcd.print('(');
  lcd.print(daysOfTheWeek[now.dayOfTheWeek()]);
  lcd.print(')');

  lcd.setCursor(0,1);
  lcdPrintDigitFx(now.hour(), 2);
  //  lcd.print(now.hour(), DEC);
  lcd.print(':');
  lcdPrintDigitFx(now.minute(), 2);
  //  lcd.print(now.minute(), DEC);
  lcd.print(':');
  //lcd.print(now.second(), DEC);
  lcdPrintDigitFx(now.second(), 2);
  delay(1000);
} // loop()
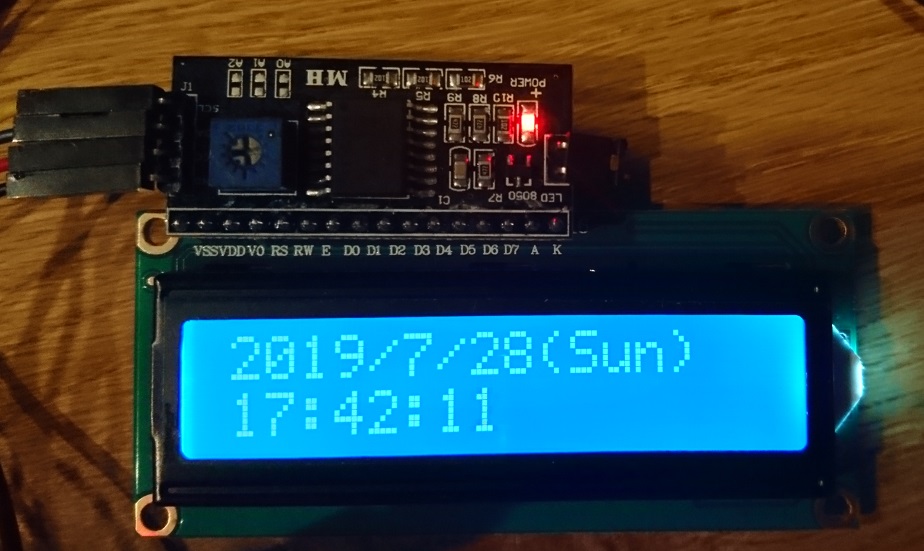
実行結果
上記スケッチを動かすと下の写真のように日付と時刻が表示される。
DS3231でも試す
上記ライブラリは前回記事で使ったDS3231にも対応している。変数の宣言を少し変更して、両方対応出来るソースにする。
LCDclock.ino
#undef MODE_DS1307
#define MODE_DS3231

#ifdef MODE_DS1307
RTC_DS1307 RTC;
const char aChipName[] = "DS1307";
#endif

#ifdef MODE_DS3231
RTC_DS3231 RTC;
const char aChipName[] = "DS3231";
#endif
…で作ってしまった後に気づいたのだが、それぞれどちらのモードで動作させても結果は同じになった。チップの仕様書でレジスタマップを確認したところアドレス先頭00H〜07Hに日付と時刻のレジスタが全く同じアドレス配置となってる。DS3231の方がアラームなど機能が多いのでアドレス08H以降に色々あるが、単にRTCとして使う場合は置き換えが可能ということだ。
コメント