
前回記事では、メモ編集画面にてSpinnerでカテゴリの選択が出来るところまで作成した。
今回は編集画面の仕上げにEditTextを追加して、コメント欄の編集が出来るようにする。
ActivityのレイアウトXML
以前の記事「GridViewによるサムネイル表示 その2」ScrollViewの内側にコメントとサムネイルが表示されるレイアウトをベースに、TextViewをEditTextに変更した。
EditTextのinputTypeに”textMultiLine”を指定することで、設定テキストに応じてViewのサイズが伸び縮みするようになる。
activity_edit.xml
<?xml version="1.0" encoding="utf-8"?>
<android.support.constraint.ConstraintLayout xmlns:android="http://schemas.android.com/apk/res/android"
    xmlns:app="http://schemas.android.com/apk/res-auto"
    xmlns:tools="http://schemas.android.com/tools"
    android:layout_width="match_parent"
    android:layout_height="match_parent"
    tools:context=".EditActivity">

  <TextView
      android:id="@+id/date"
      android:layout_width="0dp"
      android:layout_height="wrap_content"
      android:layout_marginStart="8dp"
      android:layout_marginTop="3dp"
      android:padding="3dp"
      android:textSize="24sp"
      app:layout_constraintEnd_toEndOf="parent"
      app:layout_constraintStart_toStartOf="parent"
      app:layout_constraintTop_toTopOf="parent" />

  <TextView
      android:id="@+id/catLabel"
      android:layout_width="wrap_content"
      android:layout_height="wrap_content"
      android:layout_marginStart="16dp"
      android:padding="5dp"
      android:text="カテゴリ:"
      android:textSize="20sp"
      app:layout_constraintStart_toStartOf="parent"
      app:layout_constraintTop_toBottomOf="@+id/date" />

  <Spinner
      android:id="@+id/category"
      android:layout_width="0dp"
      android:layout_height="wrap_content"
      android:layout_marginStart="8dp"
      android:layout_marginEnd="8dp"
      android:padding="5dp"
      android:spinnerMode="dialog"
      app:layout_constraintBottom_toBottomOf="@+id/catLabel"
      app:layout_constraintEnd_toEndOf="parent"
      app:layout_constraintStart_toEndOf="@+id/catLabel"
      app:layout_constraintTop_toTopOf="@+id/catLabel" />

  <TextView
      android:id="@+id/subCatLabel"
      android:layout_width="wrap_content"
      android:layout_height="wrap_content"
      android:layout_marginStart="16dp"
      android:padding="5dp"
      android:text="サブカテゴリ:"
      android:textSize="20sp"
      app:layout_constraintStart_toStartOf="parent"
      app:layout_constraintTop_toBottomOf="@+id/catLabel" />

  <Spinner
      android:id="@+id/subCategory"
      android:layout_width="0dp"
      android:layout_height="wrap_content"
      android:layout_marginStart="8dp"
      android:layout_marginEnd="8dp"
      android:padding="5dp"
      android:spinnerMode="dialog"
      app:layout_constraintBottom_toBottomOf="@+id/subCatLabel"
      app:layout_constraintEnd_toEndOf="parent"
      app:layout_constraintStart_toEndOf="@+id/subCatLabel"
      app:layout_constraintTop_toTopOf="@+id/subCatLabel" />

  <ScrollView
      android:layout_width="0dp"
      android:layout_height="0dp"
      app:layout_constraintEnd_toEndOf="parent"
      app:layout_constraintStart_toStartOf="parent"
      app:layout_constraintBottom_toBottomOf="parent"
      app:layout_constraintTop_toBottomOf="@+id/subCategory">

    <LinearLayout
        android:layout_width="match_parent"
        android:layout_height="wrap_content"
        android:orientation="vertical">

      <EditText
          android:id="@+id/comment"
          android:layout_width="match_parent"
          android:layout_height="wrap_content"
          android:inputType="textMultiLine"
          android:padding="8dp" />

      <com.example.photologger.ExpandableHeightGridView
          android:id="@+id/tn_grid"
          android:layout_width="match_parent"
          android:layout_height="wrap_content"
          android:columnWidth="100dp"
          android:gravity="center"
          android:isScrollContainer="false"
          android:numColumns="auto_fit"
          android:stretchMode="spacingWidthUniform" />

    </LinearLayout>

  </ScrollView>

</android.support.constraint.ConstraintLayout>
画面構築のjavaコード
画面構築を行うonCreateメソッドは以下。編集画面とはいえ初期値を設定するだけなので、基本的には詳細画面と同等。
EditActivity.java
    @Override
    protected void onCreate(Bundle savedInstanceState) {
        super.onCreate(savedInstanceState);
        setContentView(R.layout.activity_edit);

        mContentResolver = getContentResolver();

        Intent i = getIntent();
        mRecID = i.getLongExtra("id", -1);

        // レコードの取得
        Cursor cursor = mContentResolver.query(MyContentProvider.RECORD_URI, null, "_id = " + mRecID, null, null);
        cursor.moveToFirst();
        ((TextView)findViewById(R.id.date)).setText(cursor.getString(2)); // 日付
        mCatID = cursor.getInt(7);
        mSubCatID = cursor.getInt(8);

        ((TextView)findViewById(R.id.comment)).setText(cursor.getString(5));

        cursor.close();

        mCurAdapter = new ThumbnailCursorAdapter(this, null, FLAG_REGISTER_CONTENT_OBSERVER);

        ExpandableHeightGridView gridView = (ExpandableHeightGridView)findViewById(R.id.tn_grid);
        gridView.setAdapter(mCurAdapter);

        getLoaderManager().initLoader(1, null, this); // Loader初期化

        // Category Spinner
        cursor = mContentResolver.query(MyContentProvider.CATEGORY_URI, null, null, null, null);
        cursor.moveToFirst();

        String[] from = {"Name"};
        int[] to = {R.id.spinVal};

        SimpleCursorAdapter adapter = new SimpleCursorAdapter(this, R.layout.spinner_item, cursor, from, to, 0);
                  adapter.setDropDownViewResource(R.layout.spinner_dropdown_item);
        adapter.setDropDownViewResource(R.layout.spinner_dropdown_item);
        mCatSpinner = (Spinner)findViewById(R.id.category);
        mCatSpinner.setAdapter(adapter);
        selectSpinnerByID(mCatSpinner, mCatID);
        mCatSpinner.setPromptId(R.string.SelCatPrompt);
        mCatSpinner.setOnItemSelectedListener(this);

        // SubCategory
        cursor = mContentResolver.query(MyContentProvider.SUBCATEGORY_URI, null, "CatID = " + mCatID, null, null);
        mSubCatAdapter = new SimpleCursorAdapter(this, R.layout.spinner_item, cursor, from, to, 0);
        mSubCatAdapter.setDropDownViewResource(R.layout.spinner_dropdown_item);
        mSubCatSpinner = (Spinner)findViewById(R.id.subCategory);
        mSubCatSpinner.setAdapter(mSubCatAdapter);
        selectSpinnerByID(mSubCatSpinner, mSubCatID);
        mSubCatSpinner.setPromptId(R.string.SelSubCatPrompt);
        mSubCatSpinner.setOnItemSelectedListener(this);
    }
編集結果の書き出しをするタイミング
編集画面なので、どこかのタイミングで編集結果をDBに書き出す必要がある。Windowsなど従来型GUIだとOKボタンを押したタイミングで保存というのが多かったけれど、スマホ時代にOKボタンってそもそも見ないよね…
と思っている所で、こちらの記事にAndroidのライフサイクルイベントの解説を見つけ「アプリの永続化データを保存するのはonPause()メソッドで行う」との記述を発見。とりあえず更新内容を渡すコードや、ContentProviderからDB更新をする中身は後で付けるとして、onPause()メソッドにContentProviderを呼ぶコードを書いておく。
EditActivity.java
    @Override
    protected void onPause () {
        super.onPause();
        mContentResolver.update(MyContentProvider.RECORD_URI, null, null, null);
    }
このコードにブレークポイントを張っておくと、画面を閉じる時は勿論、ホームボタンを押して画面からフォーカスが外れる時にも呼ばれることが分かる。なるほど、スマホだとホームボタンを押してフォーカスが外れた後そのままアプリを終了させちゃうような場合もあるわけで、OKボタンで保存というのはなじまない事がよくわかった。
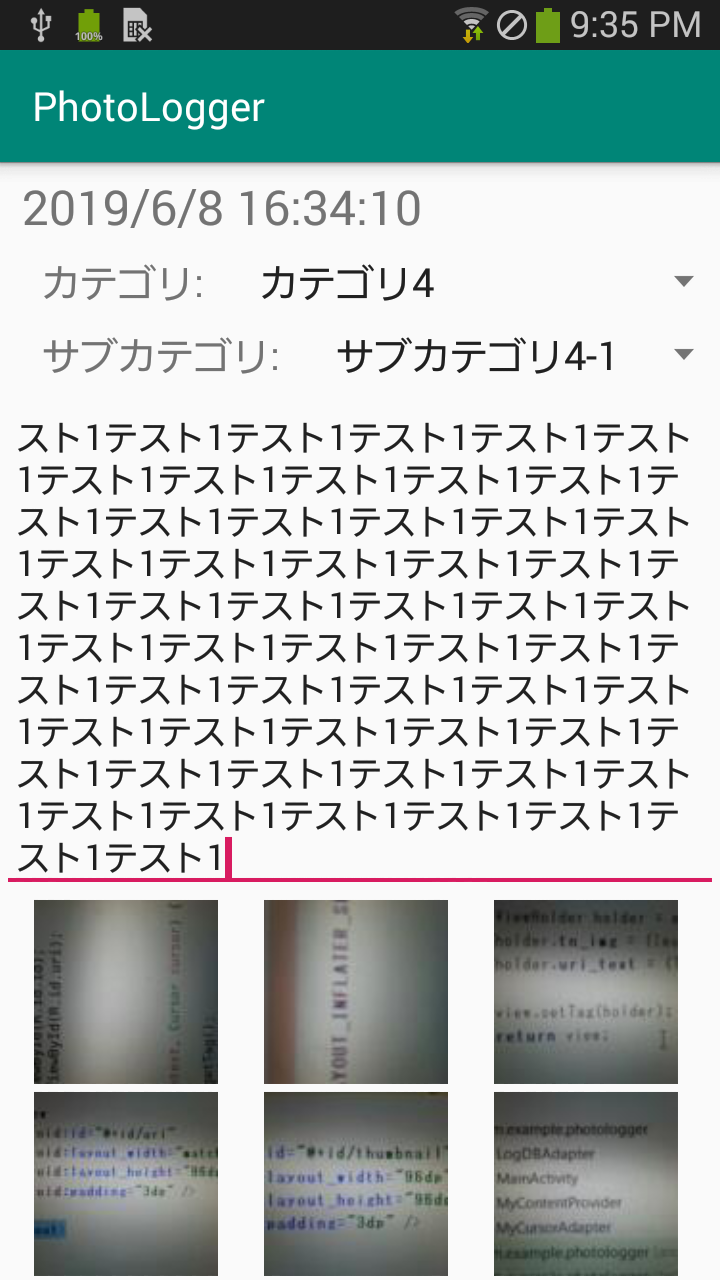
実行結果
EditTextの下線が赤色というのが微妙だが、テキストを追加するとそれに合わせてテキストの領域が下に伸び、隠れたサムネイルもスクロールバーでスクロールして見れることを確認。これで編集画面はだいぶ目標に近づいたが、次回は仕上げに写真追加のボタンを配置する。
コメント